I've had these alcohol inks for about 100 years (give or take) and was 'googling' for alternative ways to use them, other than splodging them on glossy card which didn't float my boat. I found this awesome video on YouTube from
Jogglesdotcom all about YUPO and alcohol inks and was blown away.
I really encourage you to watch this video for full details & techniques but briefly Yupo feels like good quality card but is actually synthetic (thin plastic) and it positively blows traditional glossy card out of the water. I managed to source an A5 pack of 10 sheets via the USA from Amazon to test. I paid about £5 for 10 sheets but it was worth every penny & I will definately buy a bigger quantity soon.
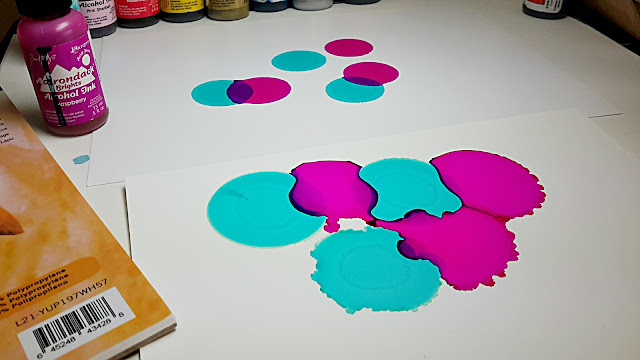
So here's my introduction to Yupo + Alcohol Inks (AI) and a comparison with regular AI glossy card (above).....Yupo (below).
To start I simply dropped a few drips of POOL AI onto each piece of 'card'. Fairly regular circles develop on both but you will notice that on the Yupo some colours will have a kind of 'halo' of colour around the outside. The POOL circles are slightly green on the edge.
Next I added RASPBERRY AI. Where the 2 colours met on the glossy card you will see that the colours just merged whereas on the Yupo, they met but moved around each other, only slightly blending.
This time I added PURPLE TWILIGHT both as individual drops but also on top of a RASPBERRY circle on each. On the glossy card the RASPBERRY circle just changed colour completely, on the Yupo a new circle of colour was formed within.
Can you see the red halo around the RASPBERRY and the pink halo around the PURPLE TWILIGHT on the Yupo? This is sooooo darned exciting!!!
Next I added CITRUS which made some unusual blends on the Yupo...reds & oranges and its own halo of orange. On the glossy card the drops continued to simply create circles.
This is SUNSET ORANGE, such a beautiful colour...
....and WATERMELON.
Here I added SAIL BOAT BLUE (darker blue) directly onto other colours. As before on the glossy card the colour just changed completely whereas on the Yupo a new circle formed inside the original.
Ok...having finished adding colour I poured some blending solution into a mini-mister and sprayed a fine mist above the glossy card sample and you'll see that not much really happens. (For gawds sake, be careful spraying this stuff...DO NOT INHALE!!!)
Spray above the Yupo and the colours appear to 'crack' & seperate....trust me....it really is stunning. If you apply blending solution directly onto a blending tool / ear-cleaner / Q-Tip and dab then you have even more control over the effect and where colour is removed....
...this is the glossy paper having been dabbed directly with the blending tool.
Oh my flamin' gawd!
This is the Yupo after being dabbed directly with the blending tool.
To finish this trial, I added 2 dots of SILVER AI to both samples and spritzed again with blending solution. The silver just 'greyed-out' on the glossy card but on the Yupo...well...you can see above. It remained a bright silver and just glistened.
So, in summary, if you love using alcohol inks then get yourself some Yupo. I will never use glossy card again. Of course white tiles are another great background for AI's, if you want to make coasters or wall art and I'm also going to try with acetate to see if I can get a similar effect.
Here's my first attempt at a landscape with AIs on Yupo. I drizzled the ink across the paper, swiped gently with a piece of card and then dabbed blending solution to create texture. This is so much fun!
I highly recommend watching the
Joggles tutorial which also also shows how to doodle with your finished creations to make stunning pictures.
And if you're hooked like me, there's an amazing group on Facebook called 'Alcohol Ink: How It's Done' which ooooozes inspiration, tips and advice.
Go on...give it a go...and if you do, let me know...I'd love to see your creations.


