Friday 30 December 2016

Say It With Flowers


Coooooeeeey!
I hope you all had a fab n' groovy Christmas and that Santa was kind.
Technically I have enough bubble-bath to last until 2018 (that's as long as fav' daughter stays at uni') and in colours and scents that will make me almost good enough to eat 😆


My card today features a beautiful stamp from WPlus9's 'Botanical Bunch' set. Sheesh, I ummed n' arrred over whether or not to buy this stamp set for ages (it's the Libran in me), putting it in my basket, taking it out again, faffing about like the procrastinator I am.


Honestly, don't EVER ask me to make instant life or death decisions...you'd die of boredom waiting for an answer.
Anyway...I digress...I bought it...eventually...and then stressed about 'had I done the right thing?'. Honesty, it's not easy being me you know.


So I think it's pretty clear how I made this card. I masked off a circular area on my piece of card and a strip through the middle. I used my MISTI to stamp the large floral stamp inside my circle. You don't need a MISTI for this but it does make it so much darned easier for getting your stamp in the right place and for re-stamping if it isn't inked up perfectly first time.


With all the masking removed, I added the recipients name, using Altenew's Calligraphy Alpha stamps, Wink of Stella glitter and purple sequins and stuck the whole lot to my card base....job done!


So 2016 is almost over.
I hope 2017 is kinder to all the good people on our precious planet...including you, you gorgeous lot.
Happy New Year!!
XXX

Saturday 24 December 2016

Deer Friends


Christmas Day is now less than 24hrs away...Woop! Woop! 
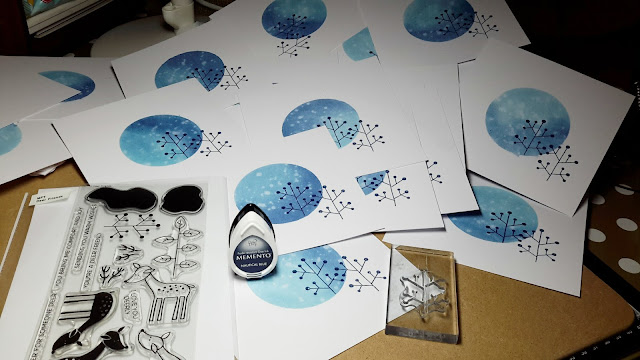
This was my card design for my gardening clients this year.


As I had so many, I prepared a kind of assembly line of crafting tasks. First up was to cut squares of watercolour card for my card bases. I then masked them off (one by one) and created a circular sky scene with Faded Jeans & Tumbled Glass Distress inks. I flicked water and dabbed with an old paper towel to add a little snowy effect.


Next up, adding the little trees from MFT's Deer Friends stamp set...


...then the sentiment from Paper Smooches.


I used my Misti to stamp lots of little deer. The Misti is so useful, especially if you don't stamp perfectly first time, or in this case, if you want to stamp layers of colours. I started by stamping the whole deer (again from the Deer Friends set) with a lighter brown and then I added a touch of darker brown to its back. 
(Ignore that dodgy deer, bottom right, I jogged my card and mis-stamped him).


I then fussy cut the deer and added them to my snowy scene with foam pads and then stuck it to my card base. A few stategically positioned sequins, a flitter of Wink of Stella glitter and a red gem nose et voila...😆


Merry Christmas to you all and thank you to everyone who has kindly commented on my wee bloglet over the past year. 
I hope Santa spoils you all rotten.
XXX

Wednesday 21 December 2016

Last of the Polar Bears

Ursaphobics look away now!


Going back over my cards this festive season, you will have noticed that MFT's Polar Bears have been very popular. I promise this is the final lot, no more bears...this year at least.
I made this for my favourite New Zealander, Chrissy. I used MFT's Polar Bear Pals and Altenew's beautiful Calligraphy Alpha stamps. That bear has the most chilled out look about him.


Blues, pinks and purples have been my go-to colours this year too.  This is another stencil from Artisic Flair Crafts called Mosaic Border.


 I use little daubers to apply my colours as I find them so much easier than the blending tool. I used Mermaid Lagoon, Picked Raspberry and Wilted Violet.


This polar bear was from MFT's Cool Day set. I dottily coloured him with Promarkers.


The sentiment was from the Merry Everything set, also by MFT. 


My final polar bear card features a brilliant dotty die from Neat & Tangled called Punchinella. I used the sparkliest glitter paper I could find to add some razzle dazzle.


You need sunglasses with this one...lol.


So there you have it. Ursaphobes can return tomorrow safe in the knowledge there will be no more bears (at least until next Christmas).

Monday 19 December 2016

More Liquitexing


Oooh I love this Liquitex Super Heavy Gloss Gel stuff!
It leaves such a beautiful effect.


I found a bunch of beautiful stencils from a company I hadn't heard of before, Artisic Flair, this one is 'Polygon'. I coloured an area in the centre with Distress Inks, Stormy Sky, Picked Raspberry and Tumbled Glass...


...and then smeared a coating of the luscious Liquitex to that area.


It's a really milky colour when first applied.


But as it it dries the colours underneath start to reappear.


Until finally you are left, in this case, with a cracked ice look. Plus it's an added bonus to have some texture.


It's those Polar Bears again from MFT's 'Polar Bear Pals'. This set has been so useful this year, they are such happy characters.


Sunday 18 December 2016

Christmas Cards Galore

A whole heap of festive cards to share with you today.


I totally stole this idea from Jennifer Mcguire, using her 'Sentiment Backdrop' technique. The sentiment on each card is from Paper Smooches' 'Christmas Sampler' set, the Polar Bears are from MFT's 'Polar Bear Pals' and Santa is from their 'Merry Everything' set.  You can see how to do this technique here


For this card I used 'Festive Fir Cones' Majestix stamps from Card-io and a host of Versa Colour inks cubes. The sentiment is from Winnie and Walter's 'The Big, The Bold, The Merry'.


I used these stamps last year on some Christmas cards and I love it. It's 'Festive Greetings' from WPlus9.

A handful of simple, glittery foliage cards using MFT's 'Leafy Greenery' die set.


Another one using MFT's 'Merry Everything'.


MFT's 'Beast Friends' and 'Precious Polaroids' dies.


And finally, as I've probably bored you senseless, a bounty of baubles from MFT's 'Santa' Elves' with a sentiment from Winnie & Walter again.


Thursday 15 December 2016

Fav Rels


Ahoy and welcome back...you crazy fools!
This was one of those cards that took several attempts...ink smudges, mis-spelt words, you name it, I messed up this one so many times. 
But after a few expletives and throwing my toys outta my pram, I finally managed to pull it off...lol
 I used MFT's 'Beast Friends'  for the festive Yetis, Altenew's 'Calligraphy Alpha' for the wording and basic Promaker colouring.

Off to tidy away my toys😉


Saturday 10 December 2016

Dashing By With Ink Smooshing


Coooooooeeeeey!
Welcome back to my wee plot on Blogland.
I though I'd try some alternative colours for Christmas cards and now I wish I'd made all of them with these colours and with this technique coz I loved it... ink smooshing.


I used 'Wilted Violet' and 'Mermaid Lagoon' Distress inks to make my background. Just 'Google' Ink Smooshing if you're not sure what it is, there are loads of videos out there that show you how to do it.


Sorry about the rubbish photo above..I was trying to show you the foiling that I used to add some sparkle to my background. It's the silver Deco Foil from Thermoweb.


I dabbed IndigoBlu Flitter Glue around my card with a bit of tissue, layed the silver foil on top (shiny, coloured-side up) and then rubbed my bone folder (or credit card if you're dead posh 😉) over the foil until it came away from the sheet.  Honestly this is so easy to do, you don't need a laminator to use the foil and the effect is quite beautiful. 


Of course the stars of my card are the polar bear and sulky penguin from MFT's 'Polar Bear Pals' and 'Toasty Greetings'. I did minimal colouring on them with Promarkers.


A few sequins to finish et voila...😆

Wednesday 7 December 2016

You're On My Nice List


Hello again.
My card today features stamps from MFT's 'Merry Everything' and Altenew's 'Calligraphy Alpha'.
Coloured with Promarkers with a layer of glitter from my Wink of Stella. The hardest part of this card was getting those sequins in just the right place.
I swear, getting those sequins postioned perfectly takes longer than the whole card making process...lol.

Friday 2 December 2016

Liquitex Loveliness


Coooooooeeeeeey!
Me again...gawd help yer 😆


For this card I used a Tim Holtz stencil called 'Crackle', mini Distress inks and Liquitex Super Heavy Gloss Gel (love this stuff).


I started by masking off a square-shaped section of the stencil onto a piece of card and then applied Peacock Feathers, Twisted Citron and Squeezed Lemonade Distress inks with little sponge daubers.


I then added an uneven layer of the Liquitex over the top with a spatula. You need to quickly remove the stencil and wash it under the tap before the liquitex starts to dry and stick to the stencil for ever. 
At this stage the Liquitex has a milky-coloured look and the colour underneath is almost lost.


But, as it drys.....


... the beautiful colours underneath are revealed again and you're left with this amazing glossy, textured look.


I added a black 'happy' die-cut and sentiment from MFT and a few sequins to finish.


Related Posts Plugin for WordPress, Blogger...