Friday 18 March 2016

Dotty About Alcohol Inks


Cooooooeeeeeey!
Me again....with another alcohol ink creation.
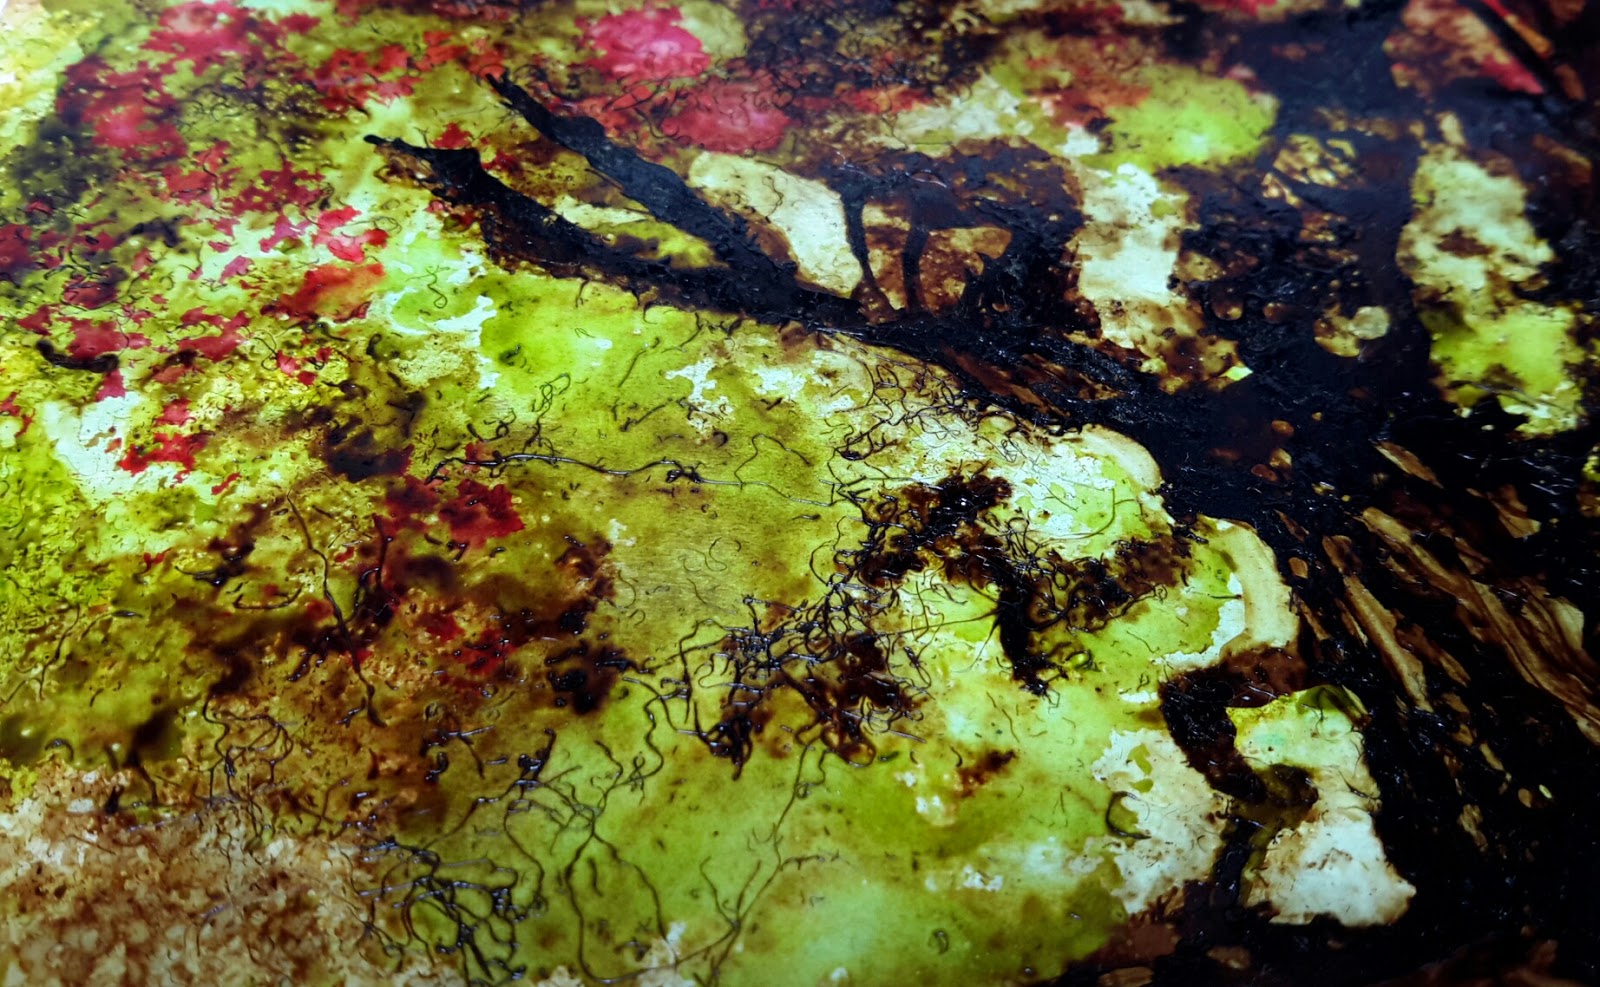
I started this one by simply drizzling blending solution across my piece of 4.5"x4.5" piece of Yupo. I used the heavier weight 200gsm version as I wanted to run it thru' my Cuttlebug at the end.


I added streaks of Raspberry & Purple Twilight and puffed the colours about with my TH air spritzer until dry.


I should have called it a day at this point but oh no...stoooopid me got carried away, added more ink and ruined it....Grrrrr....


Even my toothbrush-ink-flicking went wrong....more Grrrrs!


But I followed my own advice and left it for a couple of days to see if it could be salvaged. 


I used my alcohol ink pen, filled with blending solution, to apply small dots of liquid and soon fell in love again with my disaster.


I used MFT's Stitched Inside & Out Square STAX to give the Yupo an elegant edge and added a silver, glittered, die-cut, birthday sentiment from Clearly Besotted.
I'm so glad I didn't ditch this.

Sunday 13 March 2016

Stamping With Masking Fluid...


...and of course Alcohol Inks.
 For this card I used a 4.5"x4.5" piece of lightweight Yupo.


I quickly scribbled a Molotow Masking Fluid pen onto my stamp, in this case Altenew's 'Doodle Blooms', and gently pressed it onto my Yupo.
Of course you can simply draw any design you like with masking fluid directly on to the Yupo, but for this technique I wanted to show how you can incorporate your stamps from your crafty stash.


Don't press too hard...just gently.
You need to do this bit really quickly before the fluid drys on your stamp but don't fret if it does, just wipe it off, start again and work even faster!
If you've missed bits then just use the pen to fill in the gaps. 
Run your stamp under the tap to rub off the remaining masking fluid, it comes off really easy and doesn't ruin your stamps.


Leave to completely dry. 
An old, hard paint brush is perfect for rubbing away any stray masking fluid and to neaten any untidy lines.


I drizzled Citrus ink and moved it about until dry with my trusty air spritzer.


Then I repeated the same process with Lemonade.


Next, with the aid of an old toothbrush, I intended flicking Citrus ink across the Yupo to create a speckled effect. As you'll see I've actually flicked Raspberry instead, the reason being is I didn't clean the brush from my previous 'play session' and the Citrus reactivated the Raspberry ink that I'd used before.
Oh well...


...moving on....


I used my alcohol pen, that's filled wih blending solution, to add tiny, bleached dots.
When it was all completely dry I gently rubbed of the masking fluid with my finger and a baby wipe to reveal my stamped image. 


As per with the lightweight Yupo, I stuck it onto a scrap of white card before adhering it to my card base. A few strategically placed blobs of silver glitter and this card was finished.

Friday 11 March 2016

Painting with Alcohol Inks


Brace yourselves... it's ANOTHER alcohol ink creation!
I can hear the yawns from here...lol.
I can't help myself...I go to bed thinking inks, I wake up thinking inks...I blame the fumes!!


This is a 4.5"x4.5" piece of the cheaper, lightweight Yupo. I drizzled blending solution and some swishes of Cool Peri ink and just blew the fluids about in different directions with my Rangers air spritzer until it was dry. Cool Peri is a really, really pale mauve but it has these beautiful pink hues to the edges that I love.
I then flicked the ink nozzle to get tiny drips of colour (those bleached, looking bits in the centre).


I then did the same flicking motion with Pink Sherbert and...


...Eggplant. You do get inky fingers flicking the nozzle back but what the heck...I'm having wayyyyyy too much fun to care.


I bought these Distress Ink palettes so that I could paint with alcohol inks. You put a little squeeze of ink into each section, just enough to cover the bottom and leave to dry. To reactivate the colour, you just add blending solution or alcohol. I used a Rangers Alcohol Blending pen, filled with blending solution, to pick up the colours. 


Just use the pen like you would any pen, move it around your chosen colour, the ink reactivates and hey presto! You have an alcohol marker. I find you don't always have to wipe the marker completely clean before changing colour, just move from colour to colour as you wish. Obviously, if you're moving from dark to a light colour then clean it as best you can. I also find I don't have to clean it perfectly if I just want to create a dotty effect. 


To finish, I stuck the Yupo onto a piece of scrap card, added some silver, Stickles glitter for a touch of je ne sais quoi and adhered it to my card base with foam tape.
I hope you like it.

Tuesday 8 March 2016

Alcohol Inks and Clingfilm


Coooooeeeey!
Welcome back to Alcohol-Inks-Anonymous.
Today's creation was made with a piece of 110sm Yupo cut down to about 4"x4".
I used the lighter weight, cheaper Yupo as I was going to be moving the inks myself.


Now for some reason my camera has completely changed the colours of the inks in the photo above. I slooshed blending solution across my Yupo and then added streaks of Raspberry (which bizarrely photographed as red!!??), Purple Twilight, Snow Cap & Silver.


I then covered the Yupo with clingfilm, scrunched it up and set it aside for 24hrs. 


After 24hrs, I carefully peeled away the clingfilm and set it aside again fo finish drying. What you're left with is a crackled look, which if you do with blues can look like ice or with greens, like foliage. It's such a beautiful effect.


To finish I used MFT's Inside & Out Stitched Square Stax and a landscape die from Memory box. The sentiment is from Clearly Besotted.

Saturday 5 March 2016

Alcohol Inks & Shaving Foam - Yupo vs Glossy Card


This is an old technique using shaving foam to create inky backgrounds, but I thought I'd see how Yupo & glossy card compared.
You will need shaving foam...this was Asda's value foam...dead cheap, something to squirt a layer on (eg a tray), a selection of inks, something to move your inks about with (I had a toothpick) & something to scrap the foam from your paper (I have a 6" rule). I also recommend some bits of kitchen towel as, if you're like me, you may get a tad messy 


First, squirt out a layer of shaving foam a little larger than your paper and flatten it as best you can.


Add your inks however you like. I wanted to create another wave scene so streaked ink across the foam, but you can just drip dots about, whatever you like, the world's your oyster.


I used Mermaid (top), Pool (middle), Aqua (bottom) & drizzled Snow Cap too, although to be honest I wouldn't bother next time with the white as it doesn't show up. I then swirled it about in a wavy pattern with the toothpick and laid my glossy card straight on top, gently pressing it into the inky foam (not too deep!)


I then repeated the whole process but this time with the Yupo.


I carefully lifted out the papers and scraped the foam away in one direction across the sheet.


The one above is the Yupo and you'll see that it didn't really work...the ink just wiped off, hardly adhered to the paper at all. However...


...the glossy card produced an amazing effect.
So, if you've not been abe to get your mitts on any Yupo yet but have some glossy to hand, then why not give this a go?

Friday 4 March 2016

The Old Tree


Welcome back...I hope you're not getting too drunk on all these alcohol ink cards.
This is another 5"x5" piece of 200gsm Yupo, which initially started out as as landscape scene that I completely hashed up and left to dry while I pondered its fate.


At stage it was a splodgy mess of Citrus, Lettuce & Teakwood...and I mean a right ol' mess!! Anyway, I thought I'd try adding Watermelon to create a sky and then before I knew it I had turned into an old tree in an autumn forest instead.  


I used my TH felt applicator tool, which again like an earlier card, decided to shed its fibres into the drying inks, but hey...I didn't mind, it just added a twiggy texture.
Have a great weekend everyone. I hope you'll let me know of any inky creations you have to share.

Thursday 3 March 2016

In a Galaxy, Far, Far Away...


Me again...with the ol' alcohol inks...I know...I can hear the yawns from here ...lol.
I've 'attempted' landscapes, oceans and fiery red skies this week so today I thought I'd go all cosmic and try a galaxy.
This is 4.5"x4.5" piece ogf 200gsm Yupo and I used Pitch Black, Silver, Snow Cap & Slate.


I wish I had some kind of video device to show you how I made this, & all of my other inkings, just to prove how what often looks like a complete disaster one minute is really worth putting aside and returning to and carrying on with later. I started with a sloosh of blending solution all over the paper and then randomly drizzled the inks, sometimes tipping the paper, sometimes puffing the inks about. The Snow Cap & Silver appear to fizz as they move about. If I wasn't happy with a certain section, I either added more ink or more blending solution. 


Pitch Black actually has pinky / purpley hues to it as it bleeds into the blending solution. 
If you are having a go with alcohol inks on Yupo and you think all you're creating is a mess then I beg you not to throw it away. Walk away, let it dry, come back and add more ink, more blending solution, puff, dab, sprinkle. I'm sure you'll find something amazing will suddenly emerge. 

Wednesday 2 March 2016

Red Sky At Night...


I thought I'd have another go at a landscape.
This is a 5"x5" piece of 200gsm Yupo.


I swished streaks of colour across the paper first this time and then drizzled blending solution on top (so the other way round from my 2 previous cards). Simple tipping the card to n' fro, adding more ink and then finishing with a fine mist of blending solution in the sky.


I used MFT's Inside & Out Stitched Square Stax to give my image a more elegant edge and added a sentiment from Paper Smooches.

Please trust me when I say that alcohol inks do all the hardwork. I merely drizzle, swish and tip my paper from side to side and up and down. The inks create all the magical effects and not me. I really do encourage you to give them a go.

Tuesday 1 March 2016

Surf's Up!


I thought I'd have another go at a seascape as I just love the blues in the alcohol ink collection, plus I've now got my inky fingers on the white Snow Cap Mixative.


I used much the same technique as yesterday's post, coating my 200gsm Yupo with blending solution before drizzling streaks of ink ... Aqua, Pool & Stream.
Again I tipped my paper from side to side and puffed the inks about to help some areas to dry quicker & therefore add a kind of texture. I then added the Snow Cap, more blending solution and puffed like crazy. 


Here's a real close of the dried ink..... I think it looks really 'oceany' and that Snow Cap gives a real frothy, white water feel.


To finish, I used a stitched die from MFT to create the framework & a wavy die and sentiment from Clearly Besotted.
Did I mention I love alcohol inks?

Related Posts Plugin for WordPress, Blogger...