Thursday, 7 April 2016

International 'Alcohol Ink' Rescue


Real life, dammit, has been getting in the way of late, hence the lack of posts.
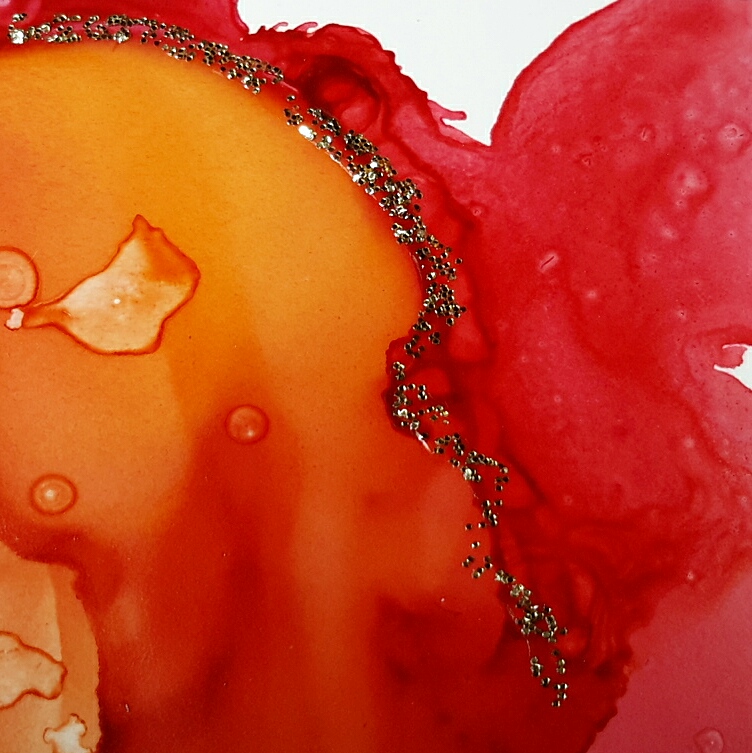
I made this alcohol ink card a few weeks back and it's teeny, tiny one.


Stooooopidly I forgot to make a note of the colours....but assume it was reds, yellows n' oranges.


The original finished item was a disaster, but instead of binning it I set it aside for a few days while I pondered its fate.


I can't stress enough about not giving up when your alcohol inking projects go wrong.
I've got several distasterous creations on my desk that I just know I'll love another day. So please, please, please...don't despair if your final piece looks like a nightmare....often a masterpiece lies within.


Believe it or not, when I looked at my mess a few days later, I saw 4 tiny sections that I thought I could rescue so I cut out 4 x 1 inch squares, added foam pads et voila!


A splash of gold glitter and now I'm in love....see...told yer!


Friday, 18 March 2016

Dotty About Alcohol Inks


Cooooooeeeeeey!
Me again....with another alcohol ink creation.
I started this one by simply drizzling blending solution across my piece of 4.5"x4.5" piece of Yupo. I used the heavier weight 200gsm version as I wanted to run it thru' my Cuttlebug at the end.


I added streaks of Raspberry & Purple Twilight and puffed the colours about with my TH air spritzer until dry.


I should have called it a day at this point but oh no...stoooopid me got carried away, added more ink and ruined it....Grrrrr....


Even my toothbrush-ink-flicking went wrong....more Grrrrs!


But I followed my own advice and left it for a couple of days to see if it could be salvaged. 


I used my alcohol ink pen, filled with blending solution, to apply small dots of liquid and soon fell in love again with my disaster.


I used MFT's Stitched Inside & Out Square STAX to give the Yupo an elegant edge and added a silver, glittered, die-cut, birthday sentiment from Clearly Besotted.
I'm so glad I didn't ditch this.

Sunday, 13 March 2016

Stamping With Masking Fluid...


...and of course Alcohol Inks.
 For this card I used a 4.5"x4.5" piece of lightweight Yupo.


I quickly scribbled a Molotow Masking Fluid pen onto my stamp, in this case Altenew's 'Doodle Blooms', and gently pressed it onto my Yupo.
Of course you can simply draw any design you like with masking fluid directly on to the Yupo, but for this technique I wanted to show how you can incorporate your stamps from your crafty stash.


Don't press too hard...just gently.
You need to do this bit really quickly before the fluid drys on your stamp but don't fret if it does, just wipe it off, start again and work even faster!
If you've missed bits then just use the pen to fill in the gaps. 
Run your stamp under the tap to rub off the remaining masking fluid, it comes off really easy and doesn't ruin your stamps.


Leave to completely dry. 
An old, hard paint brush is perfect for rubbing away any stray masking fluid and to neaten any untidy lines.


I drizzled Citrus ink and moved it about until dry with my trusty air spritzer.


Then I repeated the same process with Lemonade.


Next, with the aid of an old toothbrush, I intended flicking Citrus ink across the Yupo to create a speckled effect. As you'll see I've actually flicked Raspberry instead, the reason being is I didn't clean the brush from my previous 'play session' and the Citrus reactivated the Raspberry ink that I'd used before.
Oh well...


...moving on....


I used my alcohol pen, that's filled wih blending solution, to add tiny, bleached dots.
When it was all completely dry I gently rubbed of the masking fluid with my finger and a baby wipe to reveal my stamped image. 


As per with the lightweight Yupo, I stuck it onto a scrap of white card before adhering it to my card base. A few strategically placed blobs of silver glitter and this card was finished.

Friday, 11 March 2016

Painting with Alcohol Inks


Brace yourselves... it's ANOTHER alcohol ink creation!
I can hear the yawns from here...lol.
I can't help myself...I go to bed thinking inks, I wake up thinking inks...I blame the fumes!!


This is a 4.5"x4.5" piece of the cheaper, lightweight Yupo. I drizzled blending solution and some swishes of Cool Peri ink and just blew the fluids about in different directions with my Rangers air spritzer until it was dry. Cool Peri is a really, really pale mauve but it has these beautiful pink hues to the edges that I love.
I then flicked the ink nozzle to get tiny drips of colour (those bleached, looking bits in the centre).


I then did the same flicking motion with Pink Sherbert and...


...Eggplant. You do get inky fingers flicking the nozzle back but what the heck...I'm having wayyyyyy too much fun to care.


I bought these Distress Ink palettes so that I could paint with alcohol inks. You put a little squeeze of ink into each section, just enough to cover the bottom and leave to dry. To reactivate the colour, you just add blending solution or alcohol. I used a Rangers Alcohol Blending pen, filled with blending solution, to pick up the colours. 


Just use the pen like you would any pen, move it around your chosen colour, the ink reactivates and hey presto! You have an alcohol marker. I find you don't always have to wipe the marker completely clean before changing colour, just move from colour to colour as you wish. Obviously, if you're moving from dark to a light colour then clean it as best you can. I also find I don't have to clean it perfectly if I just want to create a dotty effect. 


To finish, I stuck the Yupo onto a piece of scrap card, added some silver, Stickles glitter for a touch of je ne sais quoi and adhered it to my card base with foam tape.
I hope you like it.
Related Posts Plugin for WordPress, Blogger...